***Note: This is a continuous project page, and I will update it with my own photos as I go! (Updates will be dated and marked with asterisks)

This is probably one of the hardest projects I’ve ever taken on. The first source that I have to give credit to is MiraxThorn’s post on the Jedi Council forums, here: http://boards.theforce.net/threads/padmes-meadow-picnic-dress-v4-0.24588679/. YES THIS COSTUME IS ADDICTING. She was completely correct. And although many of the links in her post are not working now, the incredible wealth of knowledge and tips written there has been priceless. I couldn’t have gotten this far without that thread and all the costumers that helped make it. This costume is a product of all the trials and time others have taken before me.
I think a good place to mark as my starting point was after reading through that thread and comments and posting in it in April 2014. Today’s post is my progress after 7 months of on again/off again research and acquiring. So here we go!
My very first task was to gather images from many angles. This is a good location for that: http://www.padawansguide.com/flowered.shtml (Don’t skip over the images from museum shows and the like either! There are some shots people have taken that you never get from the film. The shots from the exhibits and fashion show really helped with this project.) A lot of the pictures are high definition, which is great for fine details, like the brooch. This location is also a favorite: http://www.rebelshaven.com/SWFFAQ/picnic.php. All my photos here will either be of my own project progress or from those two sites. Especially the close-up shots of some of the costume details. The Star Wars Costuming exhibit is coming to a museum near me this January so I’m hoping the Picnic dress will be there so I can see it for myself too! The final resource I grabbed was the book “Dressing the Galaxy” for the information it could give me. The close-up image of the corset embroidery is one of the pictures in that book. (Though they cut off the top of the picture. Lame sauce)
Assembling the materials has been a major challenge, and not just because of time, but also because screen accurate items are tough to get a hold of and good quality stuff is expensive. When Trisha Biggar decides to costume, she doesn’t mess around. The head costume designer for the prequels, she would track down fabric designers after seeing fabrics at shows and have things made from scratch! There are vintage pieces of fabric used that simply cannot be recreated unless you make the fabric yourself. All her costumes for the movies are truly one of a kind works of art, and I know I can’t match it stitch for stitch, but I’m going to do my best to make something close.
***Nov 18th update: I’ve started a physical project page to record materials used! It doesn’t seem organized, but its my way of visually matching colors and keeping track of number of strands for embroidery, etc. Its a good organizational tool to use if you don’t already do something similar. You can also keep track of dye lots and such this way!

The easiest way to do THIS particular costume is to break it down in its parts, starting from her head and going down to her feet. I’ll break it down into three major sections, Head, Upper Body, and Lower Body, with subsections for each.
Head:
Hair: I have very long light brown hair. Rather than dying and trying to get my hair to hold a curl/add extensions for fullness, I’ve ordered a wig from Westbay (The wig company we order stuff from at Lakewood Costumes) that I think will do the trick. Its called “Tyra” and I got it in 4, a dark brown. It goes down to the shoulder blades and has a wavy curl. I’m going to pad out a Styrofoam mannequin head once I have it and see if I can pull it back in the style from the movie without showing the weft too much.
***Nov 21 update: I got my wig! It looks great! Dark brown, with a wavy curl. I’m going to sketch out what the hair style should look like. Once I have the buns, ribbons, and the forehead band done, I’ll be able to style it. The wig is pretty thick so showing the weft shouldn’t be a problem.

Buns: I’ve ordered the clip-in braided buns (H120) in the same color from the same company as the wig, they are 4 1/2 inches wide.
***Nov 21 update: The size of the buns I ordered is WAY too big for this costume. The color matches the wig, but they are Princess Leia sized, not right for this. lol. I have to order the smaller size. Sucks, means I have to wait another week or more.
***January 12, 2015 The smaller size is perfect, and I have finished them! Here they are!

I have crocheted my own snoods for them using crochet cotton in a gold color. (I’m not going to post a pattern, as there is a lady online who makes these. If you don’t want to figure it out yourself or don’t crochet, go to http://www.snoods.com/bunsize.html and order a pair.) I’ve bought Aunt Lydia’s Crochet Thread in metallic gold, size 10, and it looks lovely. I’ve finished both, and I will either end up sewing clips to the backside, or I will just pin them in once I am finished with the forehead ribbons.

Forehead Ribbon Band: (The hair ribbons match the ones on the sleeves, so more on that later when we talk about the shirt, with one note, the hair ribbons are only three colors, dark pink, light pink, and dark green. The arms are all five.) The forehead ribbon I’ve bought from http://www.ribbonerie.com. Go into collections, specialty, and then page 4-5 for the correct ones. They are made by a company in France which no longer makes them! They are a silk ribbon bordered on each side by a gold twisted braid. The correct color is number 4-hd-10_col_3, but it has long ago been bought out and discontinued. I bought some of the greenish blue col_4 that they had because that is the last of that style in a lighter color that they possess. I’m hoping a little dye might make it look better, I bought two yards of it so I have a little to play with dye-wise. I wish they had had a white version, so dying it could have been more possible. Once I get the color to something close to what I want, I will sew two strips together using gold thread and I will sew the embroidered roses onto it. (More on the roses in a bit in the shawl section) The forehead band goes all the way around the head and part of the hair, I will make it snap closed with clear snaps and the join will be hidden by the wig.

Upper Body:
Shawl: Walmart to the rescue on this one! Better Homes and Gardens has a line of “vintage” styled shower curtains sold at stores and online. The embroidered curtain has vines with clusters of three roses in dark variagated pinks and also single roses, and it is the closest I’ve found to the shawl material. It cost me a little over $15 dollars after tax, and the roses aren’t embroidered as well as the original vintage fabric used, but what they lack in quality they make up for in time saved.

Embroidering hundreds of little roses is not my idea of fun. I already have far too much embroidery ahead of me on this project as it is! The polyester fabric of the curtain is a white, I’m going to have to dye the fabric the golden color I need. I’m going to use a color fast product to protect the color of the roses as well, or attempt to anyways! The edge of the shawl is a green thread, and then it is PAINTED yellow. Crazy, I know, but I think I’m crazy enough to attempt this.

Brooch: This is either going to need to be something where I find a real metalworker/jeweler who can make something similar for me, or I’m going to have to make it out of silver colored clay. I’d rather do the former but its going to be pricy. More research is needed on that.
***Update January 12, 2015: Success! I have found a jewelry maker that is re-creating this pin! I’m so excited. I will share photos once they send me something, but I’ve decided to make it with real gemstones. Pink Tourmaline, topaz, sapphires and emeralds will be the stones. I’m so excited! This will be a real showcase piece, I want to do the rest of this costume justice to really bring it all back to life. The Jeweler is Anubis Collections: https://www.facebook.com/AnubisCollections

Above the original, below the wax piece before it has been cast:
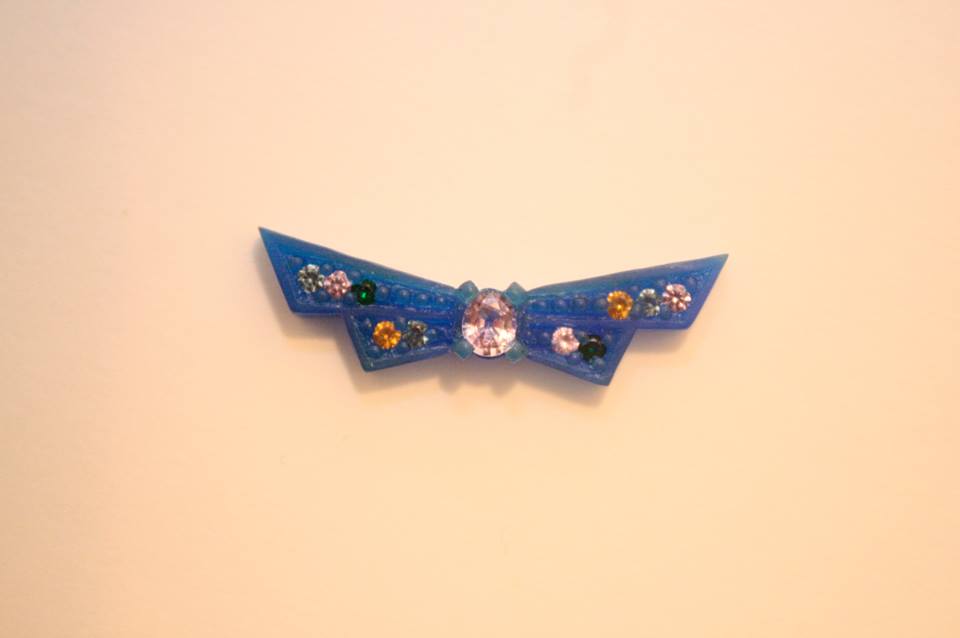
The reason there are some visual differences is to increase the longevity of the piece. It is being made with silver and the stones will be held in better so that I don’t lose them like the original costume has.
Corset: I’m having issues getting started on this because I haven’t been able to find the right fabric. I found a crushed silk Dupioni from NYfashioncenterfabrics.com, and I thought I had an almost perfect color, but then this happened:

The swatch is the color I wanted, the silk fabric behind it is what they sent. I was told that silk and dyes make it so colors don’t always match, but this is a significant color difference. I’m wondering if they sent me a Rattan colored crushed silk swatch by mistake because the crinkled chiffon in 238 is almost the same color, and then the color 29 is the light yellow of the fabric they sent. Oh well. I messaged the company and they said I could send it back with the swatch and they’d try to find a better color match. We shall see!
*** January 12, 2015: The company did not have any more of the dye lot of the swatch they sent me. Let that be a warning, call customer service and make sure you are getting the same dye lot of the fabric swatches you have ordered!!!! I have credit with the company, I think I might just have to order it in the white and dye it myself. A task of which I’m not really prepared for, but will undertake if necessary, especially since I have to dye other things as well.
Embroidery: *** Nov 18th update: These color choices are a labor of love. I agonized, holding first one color up to the high-definition photos, and then another. I used the book’s photo so that I wouldn’t have to worry about screen differences, as the colors all depend on the camera and lighting. The embroidery is machine done, but I don’t know if my machines could handle something like this. So here is the floss for a hand-embroidered corset:
Thread colors are the following in DMC floss:
Gold outlines: 5282 (I bought it in Pearl Cotton form because it was cheaper and in larger amounts than the regular floss skeins, with no visible difference.)
Flames: Lightest to darkest, 744, 743, 742, and 3853
Scalloped Sunbursts: 745 (I’ve seen some embroidery where they are two colors, but the high-definition photo in the book showed no visible difference or shading attempts inside these bits)
Leaves and Stems: 746, 734, and 731
Daisies: 744 for petals and 742 for centers
All of it is done with two strands of floss held together.
I have studied photos, and you can see that the straps are attached to the corset, not the shirt. The straps have snaps for the shirt and shawl to attach to, as well as a couple roses sewn on. This is great because the size of the roses helps determine the strap’s width!
I haven’t settled on a pattern for the corset either, but it is going to need to have a back opening that I can cinch up, and then cover with a hook and eye flap to disguise it, because I am not shaped like Natalie Portman. Either that or the corset will have to be a lot bigger, and won’t look right, because my waist won’t look slim enough. No bueno on that. I want to look as slim as I can for this. That also means steel boning. And dark yellow coutil for the inside for strength. (And if I make it adjustable I can wear it even if I lose weight!!!!!!)
Here is the embroidery image from Dressing the Galaxy and a shot of the back. You can see the way it closes in this picture from Padawansguide.com:


Ribbons: The ribbons are 5/8 of an inch wide silk ribbon. Not your normal ribbon that you can buy at the store! The ribbon colors are a gold, a light pink, dark pink, dark avocado green, and a light bluish green. There are five sets, two for each arm and one for the hair. I think I’ve found a company that I can get four of the colors from. Based in Seattle, Of the Earth (flowerseedpaper on Etsy) dyes ribbon of the size and type I need. Its cut on the bias, so there is a seam every two yards, but if I’m careful I think that will be fine. They do a good job hiding it. I can’t get the gold color, but if I get white then Dharma has a dye close to the color I want. I will list the colors I get once I order them.

Blouse: I’ve found a crinkled chiffon from nyfashioncenterfabrics.com, in 238 Rattan, which I think will work for my outer layer. It is very sheer, but with an added layer of old gold polyester chiffon from Joann’s under it the blouse should be modest enough. The smooth polyester chiffon can also be used to finish the sleeves and make the straps. I will be embroidering the blouse fabric with viscose thread from Gutermann in 8910 (a dark olive green) for the “vines” and using the four petaled off-white sequins I acquired from Afaeryschild on the Jedi Council Forums. The fabric also has “flowers” on the vines, which I decided on the 1440 Gutermann Viscose thread. Each flower has a tiny seed bead. I’m using size 11 beads that are a clear shiny bluish-green color.

Lower Body:
Skirt Top Layer: The skirt top layer is done in the same fabric and embroidery as the blouse. Its a circle skirt with a fitted waistband, with no gathering at the top. The skirt is not just one circle however. Most of the re-creators have found that you need an extra half of a circle to get the proper folds in the skirt hem. I plan on adding the extra half-circle like they did. All the edges will be done with my serger, to give it a perfect rolled hem.
Skirt Under Layer: The underlayer is a semi-sheer ivory color with splotches of pinks and yellow dye all over it. I haven’t gotten this far yet, except I ordered dye for polyester from Dharmatrading Company for it. I plan on using a polyester ivory chiffon layer because I’m spending A LOT of money on the silk for the corset and top layers of the blouse/skirt. This fabric is also on the underside of the blouse. The pink color shows through in several photos.

Shoes: I haven’t decided how I’m going to go about finding these yet. I hate buying shoes online and these are not a favorite style of mine:

And here, later, on Kelsey for the Rose Parade:

An ivory color with a pointed toe and strap, but no heel, but a wedge. I’m fairly certain the shoes in the rose parade are different from the ones in the film, but the style is similar. Yay for no heel! (Easier to walk in at conventions!) This might be something I just end up finding randomly, or I may search through the shoe catalogues at work and see if I can find something similar. (Though costume shoes ALWAYS have heels it seems like…)
And that is the breakdown of what I’ve found so far, and what I need to find. Woo… this was a long post. Forgive me! If you stuck with it, congrats, I hope the links I included helped! I will update more once I’ve gotten more fabric in!
